Receive Resources
You can specify the resources you want to receive by creating a barcode list, uploading a barcode file, or scanning in barcodes one at a time.
- Select Catalog > Resource Orders > Track sub-tab, or click .
- In the Shipped section, find the order you want to receive:
- Click
 . . - Click
 , and then click Shipments. , and then click Shipments.
- Click Show More.
- Find the resources you want to receive, and then click Receive. The Receive Items page appears.
| Barcoded |
- To assign a custodian, home location or department to the items, click Assign To.
- To receive the items one at a time, scan each barcode into the Scan…one-at-a-time field, and then click Receive.
-
|
Note: This step cannot be undone. Make sure your intent is to receive the item, as you are not warned after clicking Receive.
|
To receive all the items at once, click Receive All.Notes: This is the only way to receive barcoded items and generate a Job Summary. This step cannot be undone. Make sure your intent is to receive all the items, as you are not warned after clicking Receive All. |
- To only receive some of the items, click Show More, and then click Receive next to each item.
Note: This step cannot be undone. Make sure your intent is to receive the items, as you are not warned after clicking Receive. |
|
| Not
barcoded
|
- To assign a custodian, home location or department to the items, click Assign To.
- In the Items to Receive field, type how many resources you are accepting.
- Use the Barcodes drop-down to select if you want to add barcodes to the items.
- If you are adding barcodes, type the starting barcode, or select Assign next barcode to have Resource Manager assign the next available barcodes to the items.
Note: To print barcode labels, select the Print Labels checkbox. |
- If the items do not already have a purchase price recorded, type that information in the Purchase Price field.
- Select the assigned location and condition of the items from the drop-downs.
- Click Receive.
Note: This step cannot be undone. Make sure your intent is to receive the item, as you are not warned after clicking Receive. |
|
In-Hand Transfer
An in-hand transfer is when an item from another site in your district is scanned at your site, and then transferred to your site.
|
Notes:
- You can perform in-hand transfers only if the district is set up with
Allow sites to receive by barcode scan permission. If you are unable to perform an in-hand transfer, contact your Destiny Administrator for access.
- By default, duplicate barcodes are not allowed across the district. To allow duplicate barcodes across the district, a Destiny Administrator must complete these .
|
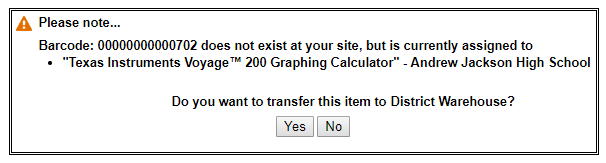
Example: An item in your district is scanned at your site, but it is currently assigned to another site in the district.
- If in-hand transfers are allowed, the system displays an in-hand transfer message.
- If the item already has a status, such as checked out, selecting Yes to the in-hand transfer message resolves any previous statuses.
|
|